What’s changed:
- Menu
- Redaction process interface
- Permanent Masking
- Tracklist checkbox
Menu
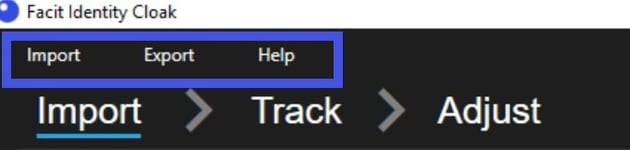
Previously, the menu bar at the top of the Identity Cloak application had File, Export, Settings, and Help. To match the menu to the stages of completing a redaction you will now see Import, Export and Help. This will allow you to change the settings based on where they appear within the redaction process. For any settings that need to be changed prior to importing your video, you’ll find them under ‘Import’, for example. Once you have changed the setting, Identity Cloak will remember this for your next redaction.
Import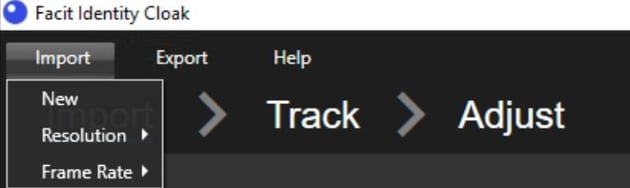
Under Import, you will find:
- New – to import a new video for redaction.
- Resolution – allows you to change the resolution settings of your video:
- Original – keeps the same resolution as your clip.
- Recommended – converts your video to HD quality
- Frame Rate – you can adjust the frame rate of your clip:
- Default – Match the frame rate of the source video.
- Standard – Adjusts frame rate based on the quality of the video.
- Optimal – this will change your Frames per Second (FPS) to 5 FPS (pre-selected for fast processing).
Export

Under Export, you will find:
- File type – the format that your video will be exported in
- .avi (pre-selected)
- .mp4
- Export without Processing – export an unredacted version of your video, useful if you have used the screen recorder feature and would like an MP4 or AVI version of your video.
Help
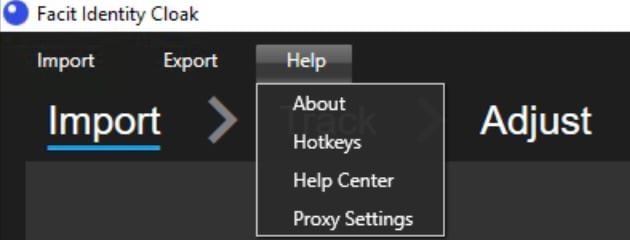
The Help section is unchanged from version 6.0.2, you will find:
- About – allows you to see:
- The version of Identity Cloak you have installed.
- Your expiry date.
- Your Licence key.
- Hotkeys – a list of shortcut keys to help you speed up your redaction process.
- Help Centre – takes you to our knowledge base for user guides and other support articles.
- Proxy Settings – displays a form for you to enter any proxy settings.
Redaction process
The Redaction steps are now more prominently visible on the screen and will allow you to see where you are in the redaction process.

Step 1 - Import
Import is the first step and will be highlighted with a blue underline when you first open Identity Cloak and will stay underlined until you have completed the import stage of your redaction. It is made up of two pages, the Home page as pictured above and the Trim page. To move into the track section of the process click Next on your Trim page.
Step 2 - Track
Track is the second step and will have a blue underline when the application moves you to the tracking page. At the start of the Track stage, Identity Cloak will process your video to detect and create tracks for all individuals in your video. Once the application has completed the processing you will be taken to the tracking page where each person will be highlighted for you to easily identify the person of interest for your redaction. By default, all tracks are automatically created but you can switch to Manual tracking by using the toggle button on the right panel for tracks. (Please note that if you switch the toggle to Manual, Identity Cloak will remember this on your next redaction, and you will need to toggle back to auto to see the automatic tracks). Here you will also be able to select Head or Body tracking. Your track list will be shown on the right-hand side panel under the tracking options. To proceed to the Adjust section click Next at the bottom of your screen.
Step 3 - Adjust
Adjust is the third step and will allow you to review and adjust your redactions. On the adjust screen, you will be able to add, remove and adjust your tracks. The right-hand panel has three sections:
- Track adjustment – add and remove redaction through our manual and dynamic adjustment of tracks. By default, Manual will be selected, like the manual and auto toggle on the tracking page, Identity Cloak will remember the one you last used.
- Blur Settings – use these sliders to adjust the degree and size of blur.
- Advanced Detection – options include:
- Licence plate
- Inverse tracks
- Full Screen blur
- Custom size blur (previously called Permanent Masking)
Once you've made any adjustments you'd like to make, you can click Export at the bottom of your Adjust screen.
Step 4 - Export
Export is the final step in the redaction process. By pressing Export at the bottom of your Adjust Screen, Identity Cloak will allow you to export and save your video in the selected format within your secure network. If you do not export your work and close Identity Cloak, you will lose your work as Facit do not store your video data.
Permanent Masking
In version 6.0.3 (and later) Permanent masking has been renamed Custom Size Blur, to reflect that it can be any size and shape for your blurred/ unblurred area. In addition to the name change the dots you create when drawing your shape have now been increased in size to make it easier to see where the points are and to match up your start and final point. Furthermore, you no longer need to click save on the righthand panel as Identity Cloak will now automatically save the shape once all the sides are connected.
Tracklist
Following feedback from customers, we have reintroduced the blur checkbox within the tracklist. This will allow users to decide if they want a particular track to be visible to the viewer or redacted. This will prevent users from having to export and re-import the video to achieve their desired redacted video. For example, you may wish to track someone in the default mode where they are visible and everyone else is redacted but then create a manual track to redact a screen which is visible for a small section of your clip.